Monday, October 29, 2012

German Apple Cake

In preparation for Hurricane Sandy, I filled all water bottles in the apartment.  I bought canned fish, bread, hummus, and contemplated what sweet treat we should gnosh on as we hunker down.  I just couldn't bring myself to buy anything when I have 10 delicious farmer's market apples sitting at home.  Should I make apple crisp or apple crumble?  Nah.  I was feeling rather nostalgic this past week so I thought I'd pull an old family favorite out of the arsenal, German Apple Cake.

My Norwegian Grandmother used to make this treat for my brother and I every time she came to visit.  I looked up a couple of recipes and finally decided on a recipe based on the photo.  I had all the ingredients so I went to work tweaking it a little to make it my own.  Here's what I used.

  • 5 apples peeled and cored
  • 2 cups all-purpose flour 
  • 4 teaspoons ground cinnamon
  • 4 teaspoons baking powder
  • 4 eggs
  • 2 cups Turbinado Sugar
  • 2 teaspoons vanilla extract 
  • 1 cup ground walnuts
  • 4 teaspoons turbinado sugar
  • 1 teaspoon ground cinnamon

  1. Preheat oven to 350 and grease a 9x14 ceramic baking dish
  2. Peel, core and slice apples  
  3. In a large mixing bowl, mix 4 eggs and two cups of sugar.
  4. Mix with a mixer for 15.
  5. While the mixer is at work, combine the flour, salt, baking powder, and cinnamon in a separate bowl
  6. After 15 minutes, add the oil to the mixture and stir
  7. Add the dry ingredients to the wet ingredients and mix well
  8. Add 2 teaspoons of vanilla and walnuts 
  9. Finally mix in the apples and spread evenly in the baking dish
  10.  In a separate dish mix the 4 teaspoons of sugar and the 1 teaspoon of cinnamon
  11. Sprinkle the cinnamon/sugar mixture over the top of the apple cake
  12. Bake for 50 minutes
  13. Remove from oven, let cool, and enjoy.
 It was as delicious as I remembered.  Grandma's version was far prettier but my cake came out a lot lighter and fluffier.  I only wish Grandma could enjoy it with me.  Perhaps I'll make her some for Christmas. 

Stay dry my east coast friends and enjoy your time off from work...
Try some German apple cake while you still have electricity. 

KIM

Wednesday, October 17, 2012

Mediterranean Fava Bean Dip

One of my co-workers, Ernesto, likes to eat almost as much as I do.  Luckily for him, he is not only a great cook but also lives with one.  And luckily for me, he likes to share.  On several occasions,   Ernesto has brought me a fava bean dip that his roommate, Ali, made.  I just fell in love with it the first time I tried it.  I have attempted to make the dip several times using both canned and soaked fava beans.  But it never quite came out the way Ali said to make it.  So, I decided to do my own research. 

This time around I used the food processor the create the right consistency. 
Here's what I used:
  •  1 can fava beans
  • 1/4 cup lemon juice
  • 1/3 cup olive oil
  • 3 cloves garlic
  • 1/2 teaspoon cumin
  • 1/2 teaspoon paprika
  • salt to taste


  1. Open can and rinse the beans
  2. Chop garlic cloves
  3. Place beans, 1/4 cup lemon juice, 1/3 cup olive oil, and garlic in the food processor
  4. Mix until a puree consistency(I had trouble with this, so I left it chunky)
  5. Move the mixture to a saucepan and add paprika, cumin, and salt.(You can add pepper flakes for heat, unfortunately I didn't have any on hand.)
  6. Heat until everything is to your liking                 


I served with carrots, broccoli, and crackers.  Pita bread is great for dipping too.


Enjoy,
KIM

Monday, October 15, 2012

Mario Batali's Pear Tart Tatin

One of my guilty pleasures is watching The Chew on ABC.  As far as daytime chat shows go, it's fun and informative.  I especially like to watch Mario Batali.  He cooks with such passion and charm.  And you know his food is AMAZING!  That being said, one afternoon I watched him make a very simple pear tart tatin.  The recipe calls for puff pastry which I was not familiar with so I set out to learn something new.  In fact, I had to look up puff pastry brands online in order get a handle on what to look for.
Thanks to yesterday's trip to the farmer's market I now have 4 lovely pears.
Here's what I did:

  1. Prepare puff pastry(mine was frozen so I had to let it thaw 40 minutes before it was ready)
  2. Preheat oven to 375
  3. Peel the pears
  4. Cut them in half
  5. Core them
  6. In an oven safe sauce pan heat 4 tablespoons of butter
  7. When that melts down add 1/2 cup of sugar(I used turbinado sugar because it was all I had)
  8. Cook until it starts to integrate nicely
  9. Add pears core side down
  10. Cook until the sugar browns(in my case it was already brown so I cooked it until I was ready with the puff pastry.
  11. Then place the puff pastry over the pears 

  12. Put the oven safe skillet in the oven uncovered for 25 minutes (I found I had to go 35 minutes.)


Batali held a serving dish on the top of the pan and flipped the tart over.  It certainly made the dish look amazing.  However, the pan was hot and a bit too heavy for me or my husband to risk losing any sauce, so we just cut it up and topped it with vanilla ice cream. 


It was delicious.  I wouldn't say this is a light dessert but it certainly is an inexpensive and fresh one. 
It came out to about $2.33 a serving including the ice cream.  

Here's The Chew's link with his recipe:


Happy Fall Y'all,
KIM
 

Sunday, October 14, 2012

Farmer's Market Challenge: Poblano Peppers


Our neighborhood Farmer's Market is starting to become a new Sunday tradition.  What can be better than seasonal, local vegetables sold by the very farmers who grow them?  I decided to challenge myself by picking a vegetable that I've never cooked with before.  So when we saw poblano peppers selling for $2 a pound we jumped at the chance to cook them up. 


I purchased 5 peppers, 4 onions, 2 bundles of kale, 3 potatoes, 3 yams, 8 apples, 4 pears for $23.  That's quite a haul.


I searched the internet for an easy stuffed poblano pepper recipe.  I wasn't looking to spend much money on dinner so I found one that listed ingredients I recognized.  I changed a few things to make it my own. 

Here is what you'll need:


  • 4 poblano peppers
  • 1 cup rice(brown or basmati might be tastier)
  • 1½ cups salsa
  • 1 15 oz. can of black beans
  • 1½ cups frozen or canned corn kernels
  • 1 teaspoon cumin
  • 1 teaspoon chili powder
  • 1/2 teaspoon Cayenne powder(or more if you like it spicy)
  • Salt and pepper
  • 1 package shredded Mexican blend cheese
  • Chopped cilantro 
  • Sour cream


  1. Cook one cup of rice in either a rice cooker or over range top following directions
  2. While the rice is cooking, wash the peppers and slice them in half.  Be careful to remove the seeds and ribs(where the heat is.)  We didn't have any plastic gloves so Rob improvised by using a plastic bag to handle the peppers. 


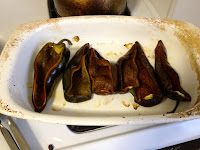
    3. Place the peppers in a baking dish skin side up. Broil about 7 minutes, and then flip the peppers and broil 7 minutes more.  (At this point, my entire house started to heat up from the spice in the peppers.  And we loved it.)

      4. Drain and rinse the black beans.
      5. Heat 1 cup frozen corn in a sauce pan.
      6. Combine beans, 1½ cups salsa, 1 cup cooked corn, about a 1/2 cup of the shredded cheese, 1 teaspoon cumin, 1 teaspoon chili powder, 1/2 cup cayenne, salt and pepper to taste. When the rice is finished mix it in too.

       7. Heat the filling a few minutes on the stove top.
       8. Place the pepper halves skin side down in a baking dish, and spoon the filing into each half.    Top with shredded cheese and bake in the oven at 400 for 20 minutes.  (You can place back in the broiler but I wanted to make sure the peppers were thoroughly cooked through.)
       9.  Top with chopped cilantro and sour cream if desired


I did the math and found that the meal cost $3.09 per serving.  I made enough for 5 servings or 6 if you have a small appetite.

Challenge completed.  I have a happy husband and a dinner for two under $7.

Until next meal....
KIM 


Friday, October 12, 2012

Fall Veggie snacks

Rob and I took a little trip to Trader Joe's yesterday.  Pumpkin flavored everything seemed to be on display.  I am still working on last week's pumpkin bread so I decided that I'd venture into some other fall favorites.  I picked up some sweet potatoes with many ideas for roasting.  And while I was looking at organic fruit, a very nice TJ's employee named Jose asked me if I like brussel sprouts.  Being a New Yorker I was a little hesitant in answering yes, but I did.  He then handed me a plastic bag of brussel sprouts and said to tell the cashier that Jose gave them to me.  Apparently they were the sprouts that fell out of the bundles he was arranging in the display. 
Yippie.  Free food is always welcome.  I think he might have noticed my very pregnant belly.  Thank you Jose.  My baby and I thank you for the folic acid. 


I decided to do a little roasting today.  So I washed my sweet potatoes and sprouts.  Then I sliced the sweet potatoes in thin round disks.  If I could trust myself with a mandolin, I certainly would buy one for  a job like this.  But I figure I'd like to keep my fingers. 

I preheated my oven to 400 and grabbed my trusted old cookie sheet.  I reached for the aluminum foil to find I was out.  Usually I would line the sheets with foil and arrange the potatoes in a single layer on top.   The sheets themselves were not looking too good so I opted for a casserole dish.  I tossed the potatoes with Olive oil, salt, and garlic powder.  Then I placed them in a single layer in the dish.  I roasted them for about 25 minutes or more until they look done.  You can go longer if you like a nice and crispy potato.  The thinner you cut the potato the more potato chip like it becomes in the roasting.  Adding red pepper flakes, Parmesan cheese, or rosemary can certainly jazz them up.  Feel free to experiment even with brown sugar and cinnamon.

This is a shot after we enjoyed quite a few. 

I then chopped up my brussel sprouts in thin slices and also tossed them with o.o, garlic powder, and salt.  I roasted them at 400  for 15-20.  We like things a little burnt in this house so we left them in a little longer.  Yum, yum.  Thanks Jose.

I wish I hadn't run out of chili flakes because the heat would have added a little more zing.  I really like to add fresh chopped garlic and rosemary to these before they get roasted.  That makes a terrific side to any meal.  We like our crunchy snacks in this house so what better way to get that fix then with healthy seasonal veggies. 


Happy snacking...
KIM


Monday, October 8, 2012

Pumpkin Oatmeal Banana Carob chip Bread

I do love the fall with all it's colors and flavors.  Pumpkins are for sale at corner stores and local markets all over the city.  I just happened to have a can of organic pumpkin puree in my cupboard so I thought I'd make a tasty, little, pumpkin bread.  When baking, I really love to use bananas.  They can replace eggs or butter in a recipe.  Luckily, I had several on hand.
Here's a photo of all the ingredients.

 
I used:
  • 2 mashed ripe bananas
  • 1 cup pumpkin puree
  • 1/4 cup canola oil
  • 2 eggs
  • 2 cups flour (you can use 1 cup whole wheat flour and 1 cup all purpose flour if you like)
  • 1/2 cup rolled oats
  • 1 tsp baking powder
  • 1/2 tsp baking soda
  • 1/2 tsp salt
  • 2/3 cup sugar (I do a a half and half with turbinado sugar and light brown sugar)
  • 1/2 tsp nutmeg
  • 1 tsp cinnamon
  • 1/2 -1 cup of carob chips(optional)
Preheat the oven to 350 and spray an 8 1/2 by 4 1/2 inch baking dish with a non stick spray. 
Mash the bananas and mix them with the pumpkin puree.  I tend to use a whole can of the puree so you can add extra oatmeal to even it out.  In went the 2 eggs (you can always use an egg substitute like flax seeds and water) and finally the oil.  Blend with a mixer on low.  
In a separate bowl I added all the dry ingredients together.  Marry the two bowls and stir together.  Add the carob chips or chocolate chips if desired. 
Today, I used one baking dish and also one muffin tin.  I baked the bread for one hour and the muffins for 25 minutes. 


There were more muffins but I had to test my product.  If you feel like butter makes everything better, then serve the bread warm with a little pat of butter and enjoy.

Yum, yum...

Friday, October 5, 2012

What to eat when you REALLY have nothing in the house.

Sorry for the two days of absence. I have been out and about.
Last night after my afternoon of shopping with my friend Rachel, I looked in my fridge and saw the same bare refrigerator I posted the day before. My husband and I just didn't have any time to head to the market. Yes, I was shopping but by the time I was through I lacked any energy to fight the 'afterwork' crowd at the supermarket. I know you feel me...

My husband had made some white rice in the 'ol rice cooker. He also found a jar of gourmet Italian Tuna we had tucked away and made himself a tasty little dish with both ingredients. Rob's from Hawaii so he's introduced me to some fabulous Asian delicacies.
One such condiment is furikake. This is a Japanese seasoning that consists of a mixture of dried and ground fish, sesame seeds, chopped seaweed, sugar, salt, and may or may not contain MSG. We definitely get the non-MSG. He sprinkled some of the furikake on his tuna and rice. He added a little soy sauce from our extra sushi orders and that was dinner.

I can't have yellowfin tuna due to its high mercury level for pregnant women. So I scrounged around for an unopened box of tofu. I took some of the veggie scramble from the other day, sans egg, and heated that up with
the tofu. I placed it over the rice. I added a little sesame oil, soy sauce, and furikake. It was filling and delicious. I'm not sorry to say I had the same thing for breakfast this morning.

Now there really is nothing left in the house but left over rice, frozen veggies and some peanut butter. Hmm... That does not sound like an appetizing meal. No excuse, off to the market tomorrow.

Kim

Wednesday, October 3, 2012

Indian on the run...

After yesterday's fridge clean out I had no food left so Rob went to our favorite Indian restaurant for the lunch Buffet special.  I know, buffets can be a little scarey.  But this place always tastes fresh and we have never had an incident.  If you know what I mean...?

Chicken Tikka Masala, crispy veggies, and a lentil-broccoli-celery curry is what is shown above.

I'm definitely looking up a recipe for the broccoli curry.  I have a lot of Indian spices in my closet so I'm game for trying it out. 

Got to run.  I'll post more tomorrow.

KIM

Tuesday, October 2, 2012

Purging

Over the past few weeks I've definitely gotten into the nesting phase of my pregnancy.  Baby boy is coming and I need to clear out all the stuff we've been holding on to.  Clearing my own stuff is easy but my husband is a little reluctant parting with his things.  He has drawers overflowing with tee shirts.  Tops he hasn't worn in over 10 years and will never wear again!  So while he's out working I have his permission to sort through these articles of clothing. 
He warned me not to make a 'keep' pile and a 'donate' pile because the entire 'donate' pile will end up back in his drawer.  I'm very proud of his owning the boarder line hoarding.  So, I plan on hiding the the 'donate' pile for one month just to be sure I don't get accused of giving away some priceless, faded tee shirt he got back in the 90's.

Here are some photos of before:  Overflowing...


 These slightly "folded" tee shirts were not allowed to be thrown away at the last cleaning. 


 And after:  Two bags were left over.  One will be put in a better Space bag to be stored.  The other will be hidden for one month before donated just to see if he misses anything.

It's slightly more organized, however now I am in need of a Space bag to condense and protect his precious tee shirts. 


I'm feeling pretty good about the 'Tee shirt purge of 2012.' 
So, now I'm looking toward my refrigerator.  What can I use to make a meal?
I have zucchini I got last week at the farmer's market, some onion, garlic, mushrooms, two eggs, left over salad, some feta cheese, and a carrot.  Hmm.  
This looks like a scramble...

 I scrambled up my two eggs with a touch of milk, salt & pepper.  I added the feta cheese and left over chopped tomato at the end. 


 I chopped up some onion, zucchini, mushrooms in a little butter, O.O., salt & pepper and garlic powder(because I was out of fresh garlic.)
I added some julienne carrots for crunch, however they got mushy and watered down the dish.  Note to self, leave out carrots. 
I mixed them all together and...
I got a lovely little scramble.  I made a little white rice in my trusty rice cooker.  Mixed it together with a touch of parm cheese and siracha for spice.  It was quite tasty.   Not bad for a meal of left overs.  My only regret was the carrots.

Now my belly is full and my fridge is cleaned but I am late for work...whoops!


Monday, October 1, 2012

Excuses, excuses...

The other day, I found myself making excuses to myself as to why I didn't do something.  I know why I didn't do it.  So why the excuse? Then I got to thinking.  If I'm making excuses to myself am I doing this to everyone else?  This thinking could have lead me down into a dark spiral of self-pity and self-hatred but really both those feelings are another form of self-centeredness.  And I was far too annoyed with myself to entertain them.
How much of my life have I been making excuses for?  I keep putting things off and justifying my reasons.  This blog for one.  My husband actually had to stop me from cleaning to sit down and write it.  Surely the laundry was more important...
 I never put off getting my hair done, shopping, or eating a meal.  Perhaps my priorities are out of order.  Speaking of putting things off...I haven't even thought about dinner. 

So, how do we end bad habits and faulty thinking patterns?


Any thoughts?